How to Install Moulded Car Carpet: The Ultimate Australian Adhesive & Fitting Guide
How to Install Moulded Car Carpet: The Ultimate Australian Adhesive & Fitting Guide
What if the secret to a professional interior restoration isn't the quality of the fabric, but the invisible bond holding it to your floor pan? Most Australian car enthusiasts know the frustration of a fresh interior ruined by peeling footwells or glue that turns to liquid as soon as the summer sun hits the transmission tunnel. Learning how to install moulded car carpet correctly requires more than just a steady hand; it demands a technical understanding of how high-temperature adhesives behave in our harsh climate.
We understand that a DIY project should result in a factory-standard finish, not a cabin filled with chemical odors and messy over-spray. This guide provides the professional techniques needed to master permanent automotive bonding using 120°C rated adhesives. You'll learn how to navigate complex curves for a wrinkle-free fit, ensure heat-resistant durability, and significantly reduce cabin noise for a more comfortable drive. We will cover everything from surface preparation to the final trim, ensuring your new flooring stays exactly where it belongs for the long haul.
Key Takeaways
- Select an automotive-grade adhesive with a 120°C thermal rating to withstand the extreme cabin temperatures common in the Australian climate.
- Master how to install moulded car carpet by prioritising a precise dry fit and trimming before you apply any bonding agents.
- Utilise a combination of aerosol sprays for broad floor pans and brush-on contact cement for high-tension areas like transmission tunnels.
- Focus your adhesive application on edges and footwells to allow for natural thermal expansion without compromising the permanent bond.
- Maximise your results by using pre-shaped flooring that follows your vehicle's specific contours, which reduces the amount of glue needed for a secure fit.
Why Specialized Adhesive for Car Carpet Installation Matters
Automotive interiors are brutal environments. Unlike the static climate of a home, a car cabin functions as a high-pressure thermal box that experiences rapid temperature fluctuations. In Australia, interior temperatures can soar well above 60°C within minutes of parking in the sun. When you are researching how to install moulded car carpet, the choice of glue is often an afterthought, but it is actually the most critical component of the project. Standard household glues or "universal" craft sprays simply cannot handle these thermal loads. They soften and liquefy, causing your new carpet to sag away from the transmission tunnel or bunch up in the footwells.
While automotive projects require specialized high-temp materials, home renovations allow for a focus on luxury and style; to explore premium options for your living space, you can discover Frankly Flooring.
Selecting the right product from the various types of adhesives available is about more than just stickiness. It is about the difference between a mechanical bond and a chemical one. In a moving vehicle, your floor pan is a source of constant high-frequency vibration. A specialized automotive contact cement creates a flexible, high-strength bond that moves with the vehicle. If you use a brittle glue, the vibrations will eventually snap the bond, leading to delamination. Professional installers avoid universal sprays because they almost always lead to carpet failure within the first six months of a hot Australian summer.
Beyond aesthetics, the right adhesive acts as a protective barrier for your vehicle's metalwork. A failed bond creates small air pockets between the carpet and the floor. These pockets trap condensation and spilled liquids, creating a perfect breeding ground for floor pan rust. A continuous, high-quality adhesive seal ensures moisture cannot sit against the steel, preserving the structural integrity of your restoration.
The Stress of the Automotive Environment
Constant road vibrations can fatigue weak adhesive bonds until they fail completely. Humidity also plays a major role; in tropical regions like Queensland, moisture in the air can interfere with the curing process of inferior glues. Cheap adhesives often suffer from "off-gassing" when heated. This process releases volatile organic compounds that can create a greasy film on the inside of your glass or even cause chemical damage to sensitive dashboard plastics. Using a dedicated high-temp automotive glue prevents these issues entirely.
Bonding to Different Substrates
Installing carpet on bare steel is a different challenge than bonding to a painted or primed surface. If you have already installed modern butyl-based soundproofing, you must ensure your adhesive won't react with the rubberized backing. Porous materials, such as jute or felt underlays, often require a "double-hit" application. You apply a light coat to the underlay to seal the pores, let it tack, and then apply the primary bonding coat. This technique ensures the carpet doesn't "starve" for glue and maintains a permanent grip. Understanding these nuances is a key part of learning how to install moulded car carpet like a professional.
The Australian Heat Factor: Why 120°C Resistance is Non-Negotiable
The Australian sun creates a unique challenge for vehicle interiors. While ambient air might be 40°C on a summer day in Adelaide or Perth, the greenhouse effect inside a parked car can push internal temperatures toward 100°C. This extreme environment causes the metal floor pan to expand and contract significantly. If you are learning how to install moulded car carpet, you must account for this movement. The glue line is the only component preventing your interior from detaching when the metal expands at a different rate than the carpet fabric.
Most general-purpose adhesives found in retail stores are rated for a maximum of 60°C or 80°C. These products are the primary cause of DIY restoration failure in Australia. Once the cabin heat crosses these thresholds, the adhesive reverts to a semi-liquid state, leading to immediate sagging. Specialized automotive interior adhesives are engineered to withstand up to 120°C, providing the safety margin required for our local conditions. Identifying these "automotive grade" products requires checking the technical data for that specific 120°C service rating before you begin your project.
Understanding Temperature Ratings
Adhesives are defined by two critical metrics: tack temperature and service temperature. Tack temperature is the heat needed to create the initial bond, while service temperature is the limit the bond can survive once fully cured. Many spray glues fail on vertical surfaces like transmission tunnels because their service temperature is insufficient for a harsh Australian summer. Thermal bond failure in the context of an Australian summer is the complete loss of adhesive cohesion when the glue reaches its melting point inside a sealed vehicle.
Testing for Heat Stability
Professional products follow Society of Automotive Engineers (SAE) standards for cyclic heat loading. These tests ensure the bond remains flexible and strong despite years of rapid temperature swings. Before buying, check the Safety Data Sheet (SDS) for the maximum service temperature. Tru-Fit Carpets by Vision Auto recommends using only 120°C rated contact cements with our moulded carpet kits to ensure the restoration survives the life of the car. This level of technical specification is the only way to master how to install moulded car carpet that remains permanent in the face of extreme heat.
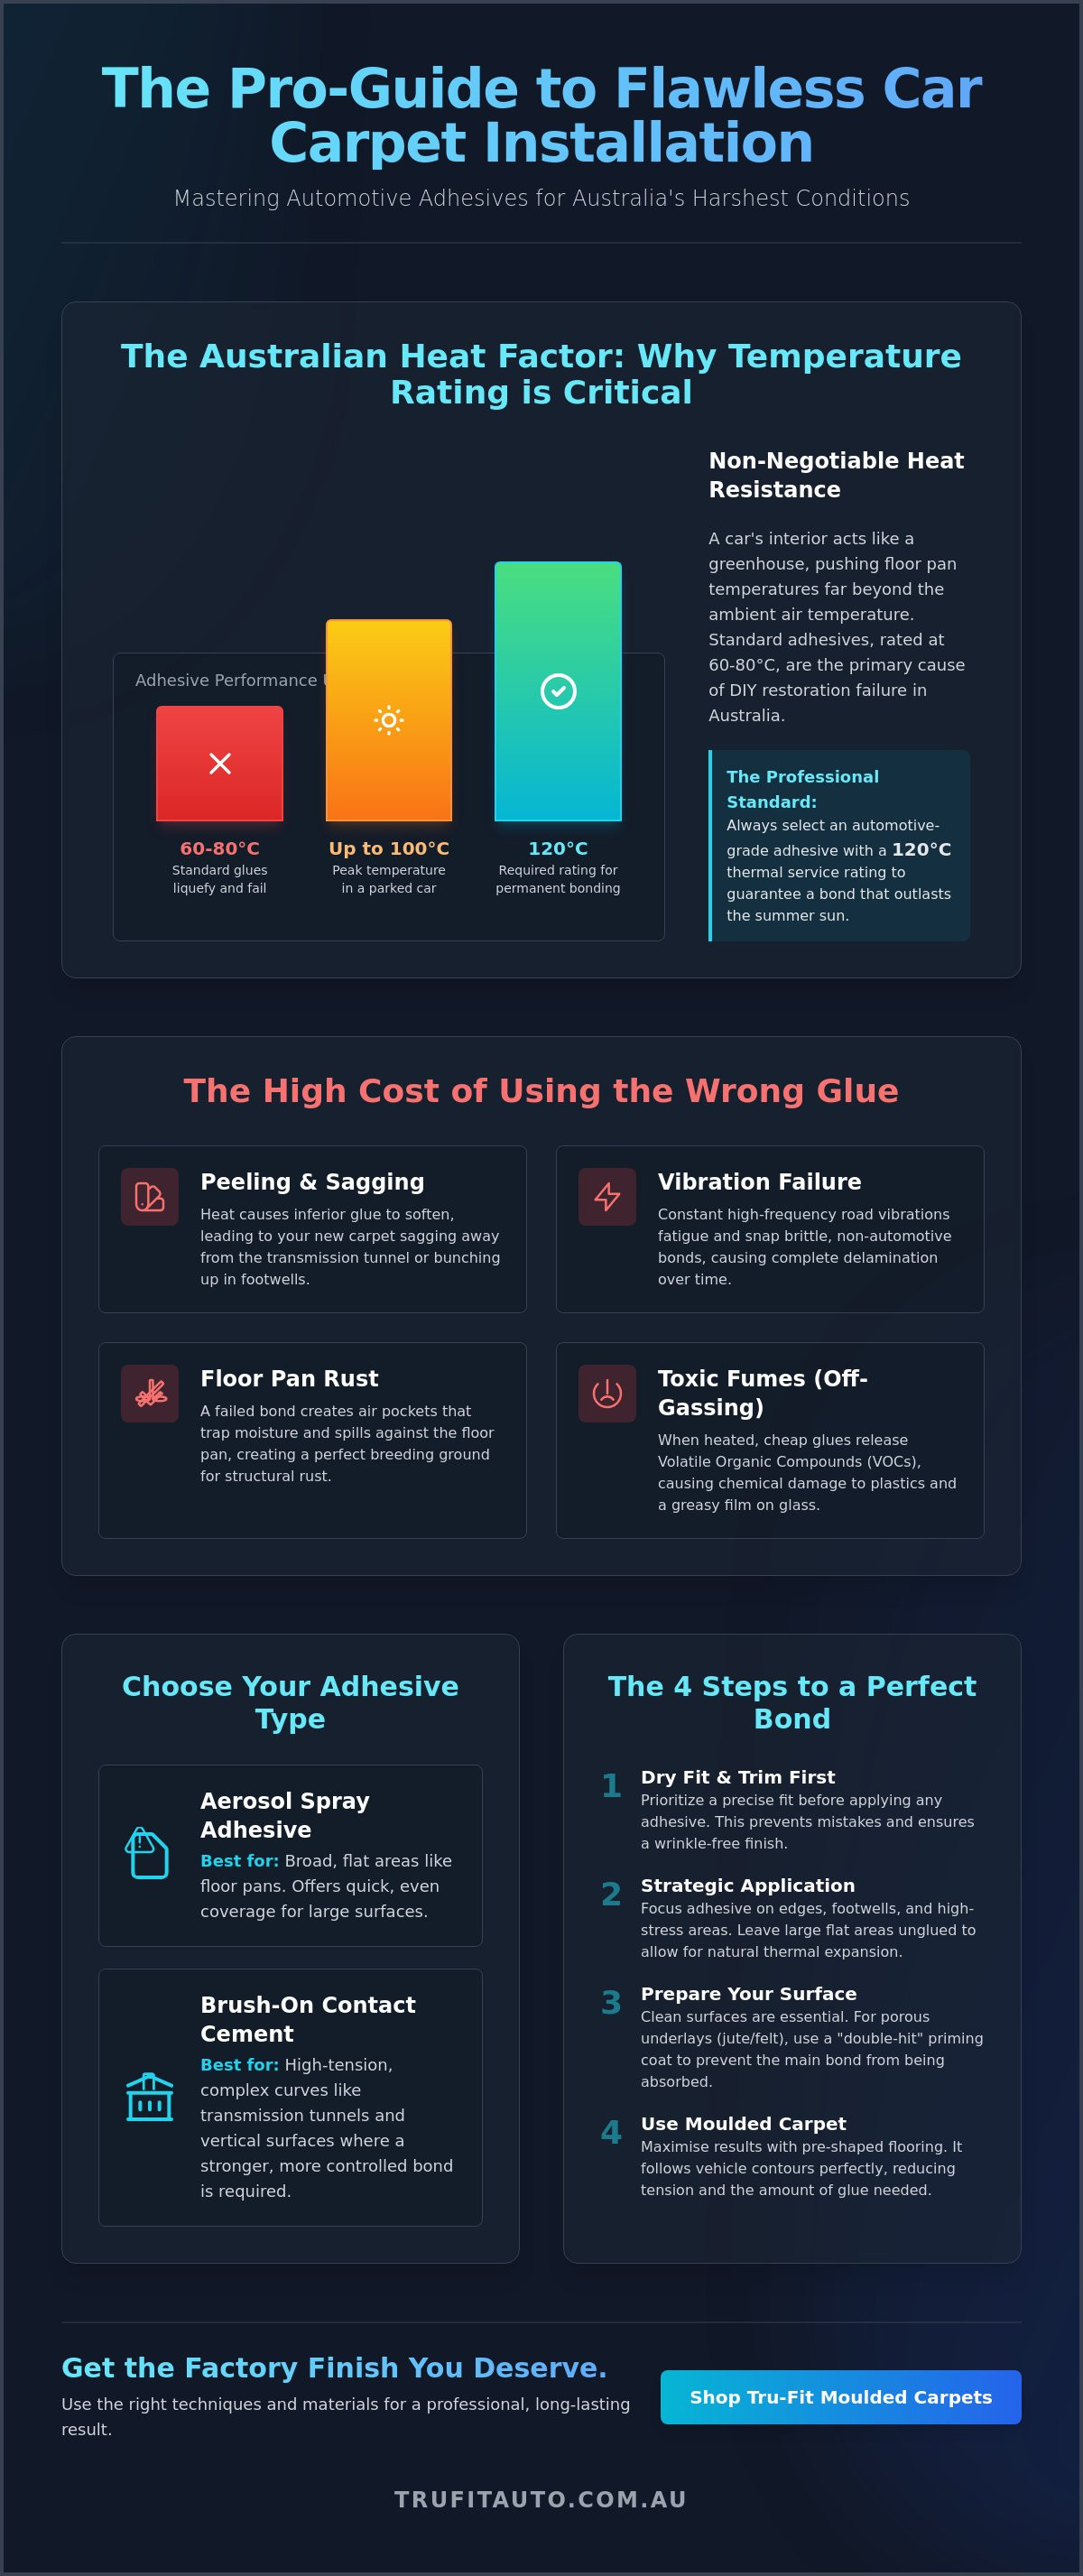
Types of Automotive Adhesives: Spray vs. Brush-On
Choosing between aerosol sprays and brush-on cements is a tactical decision based on the specific geometry of your floor pan. When you learn how to install moulded car carpet, you'll find that a single product rarely covers every requirement. Professionals typically prioritize solvent-based adhesives over water-based alternatives. While water-based options are easier to clean up, they often lack the long-term heat resistance and sheer strength needed to survive the 120°C cabin temperatures discussed earlier. Solvent-based formulas provide a faster tack time and a more aggressive chemical bond to metal and soundproofing substrates.
The delivery method of the glue determines the success of the bond. For large, flat areas, a high-quality aerosol is efficient. For complex curves, a brush-on product offers the precision needed to prevent lifting. Using the right tool for each specific zone ensures a factory-look finish that won't fail after the first few months of use.
Aerosol Spray Adhesive Pros and Cons
Spray adhesives are the primary choice for broad, flat surfaces. If you are carpeting a large 4x4 wagon or a utility vehicle, an aerosol can allows for rapid, even coverage across the main floor pan. High-quality cans feature adjustable nozzles that let you control the spray orientation and width. This is essential for achieving a professional "web pattern" rather than a misty fog. A web pattern provides more surface area for the glue to grab, ensuring the carpet doesn't shift over time. However, managing over-spray is critical. Always mask off your paintwork and seat upholstery with plastic drop sheets before you begin, as removing dried automotive glue from finished surfaces is a difficult and risky task.
Brush-On Contact Cement for Critical Areas
Brush-on contact cement is the heavy lifter of the interior world. While sprays are convenient, they often lack the "bite" required for high-tension zones like transmission tunnels and wheel arches. These areas force the carpet into tight, compound curves that naturally want to pull away from the floor. Brushing the adhesive allows you to control the thickness of the application, ensuring a deep bond without the risk of "soak-through" on plush pile carpets. If you apply too much glue, it can wick through the backing and ruin the visible fibers. For vertical surfaces like kick panels, brush-on cement is far superior as it won't drip or run like a thin spray might. You can see these professional techniques in action when you watch experts . Mastering how to install moulded car carpet involves knowing when to put down the spray can and pick up the brush for these high-stress sections.
Step-by-Step Guide to Installing Car Carpet with Adhesive
Successfully learning how to install moulded car carpet hinges on your preparation workflow. You cannot expect a professional bond if you're applying high-temp adhesive over decades of road grime. The process is methodical and requires patience, especially when managing the flash-off times of solvent-based cements in a warm Australian garage. Before you even open a can of glue, your vehicle interior must be stripped to the bare floor pan or soundproofing layer and cleaned to a surgical standard.
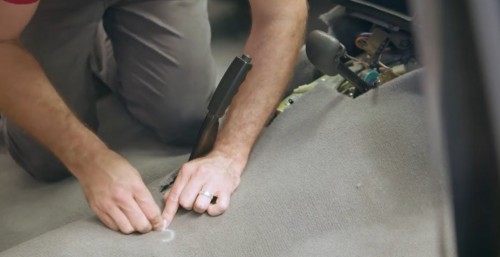
Dry fitting is the most critical stage of the installation. Lay the carpet into the vehicle, align it with the transmission tunnel and seat mounts, and let it settle for a few hours. This allows the material to relax into its factory-moulded shape. Trim only the major excess that prevents the carpet from sitting flat; leave final trimming until after the adhesive has cured. If you apply glue before verifying the fit, you risk a permanent misalignment that can't be corrected without damaging the backing.
Surface Preparation and Cleaning
Start by removing every trace of old glue and debris. Use a high-quality wax and grease remover to ensure the surface is chemically clean. If you're bonding to bare metal, check for surface rust; the "Don't Glue to Rust" rule exists because adhesive will simply pull the oxidized flakes away from the floor. For those using automotive soundproofing from Tru-Fit Carpets by Vision Auto, ensure the foil surface is wiped down to remove any manufacturing oils. Old adhesive residue must be 100% removed because new solvents can reactivate old layers, creating a lumpy foundation that ruins the finish.
The Bonding Process
The "Two-Surface" Rule is the industry standard. You must apply a consistent layer of adhesive to both the floor and the carpet backing. Once applied, wait for the flash-off period. Use the finger-tack test: touch the glue with a clean knuckle; if it feels sticky but doesn't transfer to your skin, it's ready to bond. This usually takes 5 to 15 minutes depending on local humidity. Work in sections rather than gluing the entire floor at once, as the glue might exceed its "open time" and dry out. Begin with the transmission tunnel and move toward the sills. If you misalign a section, use a small amount of solvent to reactivate the glue for repositioning. Once perfectly placed, use a hand roller to eliminate air pockets and ensure total surface contact.
Maximising Results with Tru-Fit Carpets by Vision Auto
Using a pre-formed kit from Tru-Fit Carpets by Vision Auto changes your tactical approach to interior restoration. Unlike flat-roll carpet which requires constant tension to hold a curve, a moulded product is heat-pressed to match your specific floor pan's geometry. This means you don't need to saturate the entire floor with glue to achieve a flush fit. Reducing the total volume of adhesive used also limits the risk of chemical odours and messy bleed-through into the carpet pile. The material's natural memory keeps it in place, allowing the adhesive to function as a stabilizer rather than a structural anchor.
Strategic application is more effective than total coverage. When you are finalising how to install moulded car carpet, focus your bonding efforts on transition zones where the floor meets the sills and around seat mounting points. Integrating this flooring with our automotive soundproofing creates a multi-layered barrier that blocks both heat and road noise. This combination ensures the bond isn't just permanent, but also contributes to a significantly more refined cabin environment; for those looking to add a final touch of customization through branded interior accessories, you can learn more about Transfers by MoreTranz.
The Moulded Carpet Advantage
The pre-formed shape naturally stays in place, significantly lowering the shear stress on the glue line. This is particularly helpful for DIY restorers working on complex 4x4 floor pans or classic sedan transmission tunnels. Using a kit from Tru-Fit Carpets by Vision Auto eliminates the need for intense stretching and steaming, which are the main sources of frustration with universal rolls. Because the carpet isn't fighting to return to a flat shape, the risk of the glue "letting go" during a hot Australian summer is greatly reduced.
For commercial vehicle operators who require this level of durability to handle high volumes of passengers, it is also beneficial to visit Footfall Australia for advanced people counting solutions.
Final Finishing Touches
Complete the job by installing kick panels and scuff plates. These components act as mechanical fasteners that lock the carpet edges down, preventing them from catching on boots or lifting during vacuuming. Allow for a full curing window before adding weight or installing seats. While the interior looks finished immediately, the bond requires time to reach full chemical strength, especially in high-humidity regions. Once cured, your new flooring from Tru-Fit Carpets by Vision Auto will provide a factory-standard finish that stands up to years of heavy use. Browse our vehicle-specific moulded carpet kits today.
Restore Your Interior with Confidence
Mastering how to install moulded car carpet is a rewarding project that transforms the comfort and value of your vehicle. Success depends on two critical factors: selecting an adhesive with a 120°C thermal rating to survive the Australian sun and following a disciplined preparation workflow. By prioritising a chemically clean floor pan and utilizing the "two-surface" bonding rule, you ensure a factory-standard result that won't sag or peel over time.
Tru-Fit Carpets by Vision Auto has been Australian made and owned since 1970, providing restorers with precision-engineered flooring solutions. We offer custom-fit options for over 700 vehicle models, ensuring your installation requires less adhesive and delivers a superior fit. If you run into any challenges during your project, our team provides expert technical support to guide you through the process. Shop Tru-Fit Carpets by Vision Auto's Range of Moulded Carpets & Installation Accessories to find the perfect match for your ride. With the right materials and a methodical approach, your interior restoration will stand up to the harshest conditions for years to come.
Frequently Asked Questions
How long does car carpet adhesive take to dry before I can install the seats?
You should wait at least 24 hours for the adhesive to fully cure before reinstalling seats or heavy interior components. While the bond might feel firm after an hour, the chemical cross-linking required to handle the weight and shear stress of a seat mount takes a full day. In cooler or highly humid Australian conditions, extending this period to 48 hours is a safer approach to ensure the carpet doesn't shift during assembly.
Can I use regular contact cement from a hardware store for my car carpet?
Standard hardware store contact cements are typically rated for domestic use and lack the thermal stability required for automotive cabins. These products often fail at 60°C, whereas a car interior in direct sun can easily exceed 80°C. Using a dedicated automotive-grade adhesive with a 120°C rating is the only way to prevent the glue from liquefying and causing the carpet to sag or delaminate over time.
What is the best way to remove old, dried glue from my car's floor pan?
The most effective method is using a combination of a specialized adhesive remover or wax and grease remover and a stiff plastic scraper. Apply the solvent to a small section and allow it to soften the residue for several minutes before scraping. For stubborn patches on bare metal, a wire wheel attachment on a drill can speed up the process. Ensure the surface is completely dry and free of oily residue before you begin learning how to install moulded car carpet.
Do I need to glue the entire carpet down, or just the edges?
You don't need to coat the entire floor pan; instead, focus your adhesive on high-tension areas and edges. High-wear zones like the transmission tunnel, kick panels, and wheel arches require a secure bond to maintain their shape. For the main floor sections, a perimeter bond is often sufficient, especially when using a pre-formed kit. This allows for slight thermal expansion of the metal floor without putting excessive stress on the glue line.
Will the glue smell linger in my car after the installation?
The strong solvent odour from automotive adhesives is temporary and typically dissipates within 48 to 72 hours if the vehicle is well-ventilated. Leave the windows down or doors open in a secure, dry area during the curing process to accelerate the off-gassing phase. Choosing high-quality professional adhesives helps minimise the duration of the smell compared to cheaper, lower-grade alternatives that may release vapours for longer periods when heated by the sun.
How much adhesive do I need for a standard sedan or 4x4 floor?
A standard sedan typically requires two to three 500ml aerosol cans or approximately one litre of brush-on contact cement. For larger 4x4 wagons or vans with more surface area, you should have at least four cans or two litres on hand. Having a surplus is better than running out mid-project, as a consistent two-surface application consumes more product than most DIY installers initially expect for a permanent automotive bond.
Can I apply adhesive directly over sound deadening material?
You can apply adhesive directly over butyl-based sound deadening, provided the surface is clean and free of the manufacturer's release oils. Most modern soundproofing materials are designed to accept automotive adhesives, but you should always perform a small patch test first. Understanding how to install moulded car carpet over these layers is essential for a quiet cabin, but ensure the deadener is firmly rolled down to the metal before gluing the carpet on top.
What should I do if the adhesive 'soaks through' the carpet and shows on the top?
If adhesive wicks through to the pile, you must act quickly with a clean cloth and a small amount of solvent-based adhesive cleaner. Gently dab the area rather than rubbing it, which can push the glue deeper into the fibres. To prevent this, avoid over-applying the glue and ensure you allow for the correct flash-off time. When the glue is properly tacky rather than wet, it is far less likely to soak through the backing.